I just wrote many articles on what is new in Excel 2016. But there is a goldmine of useful stuff in Excel since decades – which is completely unknown to the world. So I am going to introduce few such invaluable and powerful features in this series, starting with the golden Excel scroll bar.
In Excel, we can add a scroll bar to change values in a cell. It sounds like a primitive and not-very-useful activity. But just hold on. Learn it and then see for yourself.
Contents
Different Approach
Regular readers of this blog are familiar with my approach. I usually state a problem we face and then provide the solution. In this case, the Problem-Solution approach will not work. Because there is no problem!
This time, I will show you the solution (feature) first and then the problems will suddenly become visible!
What is a scroll bar
All of us know that. Excel has a horizontal and vertical scroll bar. I am NOT talking about those scroll bars. We already know how to use them. (Not really. I will write another article about them later).
Here we will add a scroll bar of our own – on top of regular Excel sheet. Here are the steps.
- Scroll bar can be added from the Developer tab
- Developer tab is not active (visible) by default. We must activate it.
- Right click anywhere on the Excel menu (ribbon) and choose Customize Ribbon
- Big, scary dialog appears. The list on right side shows all the familiar menus. Those are already selected. One poor menu seems sidelined and ignored. That is the Developer menu. Select the checkbox and click OK.
- Now you will see the Developer tab in the menus. Click on it and see all the options.
- This is where macros are written and edited. But we are more interested in the Insert area on this tab.
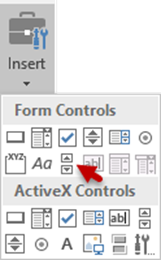
- Open the Insert Dropdown and observe the various things which are available.
- Click on the item shown above. That is the scroll bar. Mouse cursor will change to a crosshair now. Draw the scrollbar on the sheet like we draw a rectangle shape.
- It is still selected. Click outside the scrollbar, anywhere on the sheet. Now click on the arrow buttons or drag the dark gray portion to scroll. Works?
- Of course it scrolls. But this scrolling is aimless and useless. Let us make it useful.
- Right click on the scroll bar and choose Format Control
- Choose the Control tab. Look at all the options.
This is the place where the scrolling can be put to use.
You decide which cell will be controlled by the scroll bar.
You can also specify the range of values.
When scroll bar moves you can decide how much change occurs to the values.
Incremental change is small change. Page change is big change – like page down.
To start with, let us go with these settings and click OK - Now test the scroll bar. Click on the arrows. Drag the scroll handle and click between the scroll handle and the arrows (this is like pressing page down / page up)
- Notice the value in A2 changing accordingly.
Congratulations. We have an active scroll bar now. So far we just learnt the mechanics of it. We know the feature at technology level now. But as yet, it does not seem to have any practical benefit at all.
Don’t worry. If there was no benefit, why would Microsoft waste time creating it?
Now let us find some use for it
This is what I call Solution to Problem approach. Download this Excel file.
The scenario is simple. Let us say I am planning a training program. I charge different fees for individuals, corporates and students. I don’t know how many people from each category will sign up. But I still want to create a simple calculator to try out different combinations. So I have set up this data.
Each scroll bar controls the cell in Pax column indicating number of expected participants. Now, based upon the estimate, registrations, marketing response it is easy to tweak each number quickly and see how it will affect the total revenue.
This is called What-If analysis in its simplest form. Try it out and you will see how easy and intuitive it is.
What is the benefit of using the scroll bar?
Technically, it just allows you to change the number in a specific cell across a set range very quickly. Imagine typing various numbers manually and changing the estimates.. that would be tiring and cumbersome.
In itself, this is of limited benefit. But once these numbers are used in further calculations, we can get amazingly useful stuff out of it.
That’ all for now. In the next article in this series, we will see similar controls – Spinner and Check box. Later we will use all these together to create extremely useful and powerful tools for varied business scenarios.
***


