Creating software demos videos requires you to do Screen Recording. Sometimes you need to record your entire live session. Video camera is NOT needed. Here are various software solutions available to you.

Estimated reading time 10 min
Contents
Screen Recording options
The idea is to record all screen activity and convert it to a video.
First decide the objective.
- If you want to record a PowerPoint presentation and your voice, use Record Narration feature. Read this article: Creating reusable, narrated training content using PowerPoint (all versions of PowerPoint)
- If you want PowerPoint presentation, your voice, webcam input and annotation, use PowerPoint add-in called Mix (PowerPoint 2013 onwards)
- PowerPoint Screen Recording is available from 2016. It records full screen or part of video and embeds the video directly into current slide. Later, you can export the entire presentation as a video.
- If you want to record all the activity on the screen along with your voice there are many options available
- For low resolution recording of my live sessions I use Windows Media Encoder (Free). It is good enough as a reference. Only WMV files can be created here.
- For high resolution recording I use SnagIt (49 USD). Creates MP4 files.
- For high resolution recording where I want to do editing and annotation later I use Camtasia. This produces the most professional output. (299 USD). This one creates all kinds of output – and is the most comprehensive screencast software since at least a decade.
We will explore Windows Media Encoder in this article.
Download Windows Media Encoder V9
This is a very old software. It is free. The latest version is called Expression Encoder. But you have to pay for it. I use the older, free version.
Download Windows Media Encoder V9 and install it. It is just 9.5 MB in size.
Screen Size
Screen size affects the video file size. I create videos of all my seminars and events where I speak. Usually the screen size is limited by the projector capabilities.
For 4:3 aspect ratio projectors I use 1024 x 768 resolution.
For 16:9 (widescreen) projectors I use 1200 x 768 resolution.
You can use higher resolution if it is really necessary. Otherwise stick to these sizes.
Check Microphone
Most laptops have built-in microphone. Desktop PCs need an external microphone. Check if the microphone is working and adjust its level. All versions of Windows have a simple Sound Recorder utility. Use it and check if the sound is being recorded.
Often the microphone sensitivity is low. Change it if required. Open the Sound settings dialog. Right click on the Volume icon in the taskbar and choose Recording Devices.
In the dialog, choose the Recording tab and identify the active microphone. Tap on the microphone and see the green indicator moving. That is the active one.
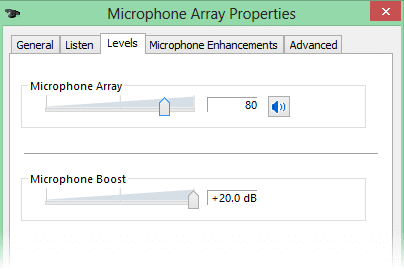
Right click on it – Properties – Levels tab. Adjust the level and the microphone boost. I use these settings.
You will need to find the optimal settings for your microphone by trial and error. Start with these settings, use Sound Recorder to record a sample. Check the output and adjust accordingly.
This level needs to be adjusted based upon whether you are speaking with or with a sound system in the conference room / auditorium. Try to maximize your captured volume while keeping the external noises like air-conditioning hum, laptop fans to a minimum.
Change the screen size BEFORE starting Windows Media Encoder.
Using Windows Media Encoder (WME)
WME can be used for many things. But we are going to cover only the screen recording part of it. Start WME. A dialog pops up. Choose Capture Screen.
Choose Entire Screen. Remember to enable the Audio checkbox. Otherwise you will get a silent movie! Click Next.
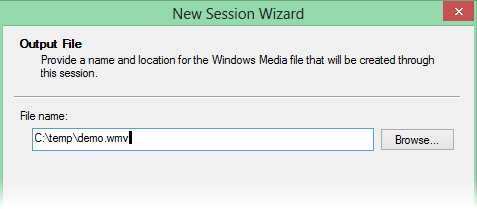
Specify the path of output file. Remember to add the .wmv extension. Otherwise it shown an unnecessary dialog. No other file formats are supported.
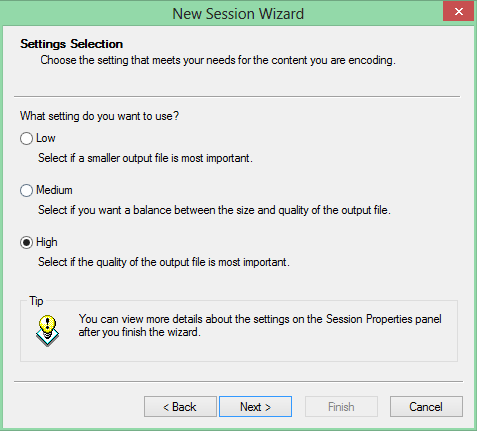
Choose High resolution. It is actually not high. But this product has been there since 1995. In todays context it is fairly mediocre resolution. But don’t worry. It is sufficient enough to create a reference video. We are not aiming for broadcast quality here.
In the next step you can specify Title and other information. It is optional. Click Next.
Choose the Begin capture… checkbox. Click Finish.
A dialog will appear. When you click Ok, recording will start.
Now whatever you do on the screen along with whatever the microphone picks up will be recorded.
When you start recording, the WME window itself minimizes to the task bar.
Pause recording during breaks
To Pause recording, click on the WME icon in the taskbar.
The WME window opens. Now recording is Paused.
Do this during breaks, discussions or whenever something off-the-record / confidential is being discussed.
Remember to restart recording after the break
I always forget to do this. So I ask the audience to remind me when I announce the break.
That works!
To Resume recording after a pause, click on the Start Recording button again.
Stopping the recording
Click on the WME taskbar icon to pause and click on the Stop button.
There is a separate Pause button but that is only useful if the WME window was visible while recording is going on. By default the window minimizes. You can change this setting from Tools Options.
Warn before stopping recording is a very good option. This prevents you from stopping recording by mistake. Once recording is stopped, it cannot be resumed. So be careful.
Running the file
When recording stops, a dialog shows the details of the output file. It also has a Play button which will run the video immediately.
Warning: You may overwrite your recording
I have made this mistake many times. When you open the WME next time, it remembers the output file name. If you are not careful, you will end up overwriting the older file.
To prevent this from happening, the best practice is to change the output file name as soon as a recording is stopped. Even if you are not planning to record another session immediately, it makes sense to change the output file name. I change it to test.wmv. This method works.
Do not attempt further editing
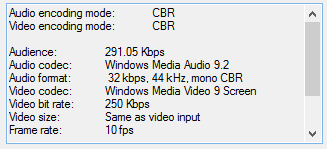
This recording is already in a fairly low resolution. If you try to edit it, there will be further loss of clarity. Here is the resolution of recorded video. It is fairly good quality. Gradients are also shown quite well. There is a little blur.
In case of blue ribbons of 2007 and 2010, some banding does occur but it does not interfere with learning. Depending upon the software you are recording, the results will differ.
Technically this quality of recording is at around 200 Kilo bits per second (kbps).
The quality settings can be changed from Properties – Compression section. But these are technical settings. If you do not understand the meaning of those terms, avoid customization.
Microphone may stop in between
I have found this to be a problem only with OneNote. If WME recording is already ON and then I start recording within OneNote (Insert – Insert Audio), sometimes the microphone is MUTED automatically. There is no visual indication of the microphone being inactive. You only realize it after the session is over – which is too late.
Therefore, the best practice is, if any other application is going to use microphone, check the microphone level immediately. If you notice that it is muted, you can unmute it and correct the problem as soon as it happens.
Video File Size
At the default recording resolution (High), one hour of recording usually takes up 70 to 90 MB for a screen size of 1024 x 768.
DRM
If you want to protect and sell your content, Digital Rights Management is built into it. You must sign up with some DRM provider and then configure the DRM keys in the WME Properties – Security tab.
Using DRM, it is possible to allow users to run the video specific number of times, or for specific duration and even include cross / up selling. This protection is similar to the one used for music and films / TV shows in Video format.
Higher resolution recording
If you know the technology of Video compression and related topics, you can tweak the recording quality from the Properties – Compression tab. These settings produce high quality video. The disadvantage is that the file size will be significantly larger.
Try this and let me know your experience.
What Next?
We will cover SnagIt usage in the next article.
***


2 Responses
This is THE BEST solution I have found to my need of recording tutorial videos. It works flawlessly, and also creates a file size that is manageable without burning quality. Wow! Thank you World Champion of MS Office 365 Dr Nitin Paranjape
Cheers