This is a revolutionary macro which helps you arrange pictures automatically in PowerPoint. Just add pictures, select them and click. That’s it. It works amazingly well for smaller pictures like logos or icons. Behind the scenes it uses SmartArt. Download and use this macro.
Contents
How does it work
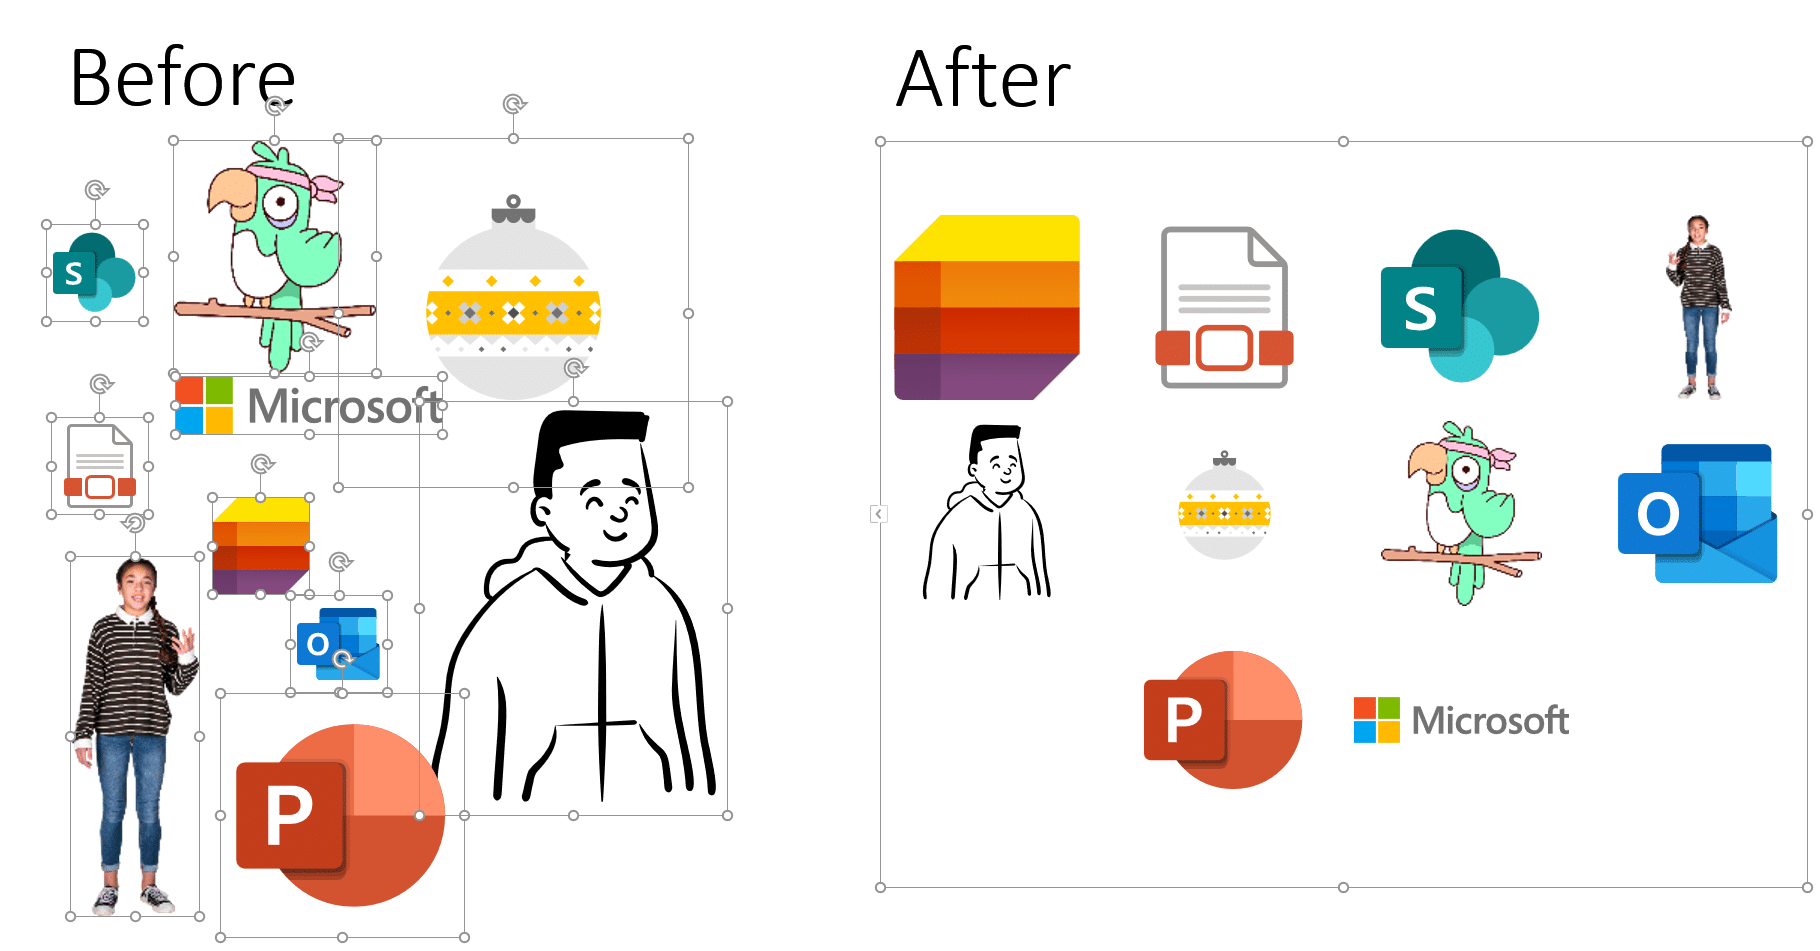
Before you go ahead, have a look at what the final version looks like.
Why do you need this macro
If you want to arrange multiple pictures, there are three options for you. However, each of these options some disadvantage. The options are:
| Method | Disadvantage |
|---|---|
| Arrange pictures manually | This is time consuming and repetitive. Obviously, you waste a lot of time in cropping, adjusting and fitting pictures. |
| SmartArt | Yes. You can select multiple pictures and then choose Picture Tools tab – Layout dropdown and choose one of the picture layouts. The most convenient are Picture Grid or Bending Picture Semi-transparent Text. The pictures are instantly arranged. Time is saved. But there is a problem. The issue is that the SmartArt picture shapes are square (1:1 aspect ratio). If a picture has a different aspect ratio (rectangular), then only a part of the picture is visible. This happens because the default picture setting is Fill. But what we really need is Fit the picture. Sadly, when you multi-select the pictures within the SmartArt, the Fit option becomes unavailable. |
| Design Ideas | Just add pictures, click Design Ideas in the home tab and it will arrange pictures automatically. Unfortunately, it is limited to few pictures (10 pictures, as of Jan 2022). Furthermore, Design Ideas sometimes crops parts of pictures based upon its algorithm. |
This picture arranger takes care of all these disadvantages.
- You can put as many pictures as you like. We have tested it with 200 pictures. But there is no technical limit.
- All pictures are automatically FITTED (not filled)
- No part of the picture is cropped.
Download the Add-in
Use the sample file to test the macro. But first you must install the macro in PowerPoint.
The macro is available as a PowerPoint Add-in – PPAM format.
- Download the PPAM file
- Open the file in File Explorer, right click and choose Properties.
- See if there is an option called Unblock. If you see it, Unblock the file.
- To install it inside PowerPoint go to File – Options – Add-ins
- Open the Manage dropdown and change it from COM Add-ins to PowerPoint Add-ins
- Click the Go button
- Click the Add New button and select the Add-in file (PPAM)
- Close the dialog
- Check the Add-in tab in PowerPoint
- Now the macro icon(s) will be visible.

How to arrange pictures automatically
- Go to the desired slide.
- Add pictures, icons, illustrations, logos, SVG files, stickers, people callouts or cartoons.
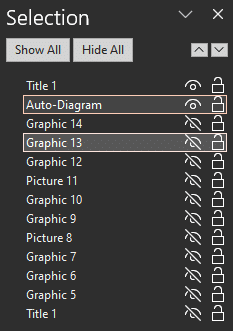
- Keep the Selection Pane open. This helps you see all the objects on the slide.
(Home tab – Selection dropdown – Selection Pane) - Select the pictures you want to arrange.
- From the Add-in tab – click Arrange Pictures button
- This will create a new object – SmartArt – with all the selected pictures
- Original pictures are hidden.
- Once you confirm that the output is fine, you can delete the hidden pictures.
Please note that if the selection contains objects which are not pictures (like Text / 3D objects) those are not processed. Such objects will remain visible.
Please note that grouped pictures are not supported.
Best for “Our Customers” type of slides
Everyone wants to show off their customer list. What do you need? Lots of logos. And lots of time to arrange them manually. For this purpose, we created the macro. Try it out.

How to arrange pictures in a particular order
Before running the macro
Usually, you will select all pictures with Select All or some similar bulk operation. In this case, the pictures will be arranged in the order in which those were added to the slide.
However, if you want to have the pictures in a specific order, you will need to select the pictures in that order. Of course, this is feasible only when there are few pictures. Nevertheless, you can use it when needed.
Click the first picture. Then for subsequent pictures press Shift button on keyboard and click on the picture. After selecting the pictures, run the macro as shown above. In this case, it arranges pictures in selection order.
After running the macro
The arranged pictures are SmartArt. Therefore, you can rearrange it anytime. Click on any picture and use the shortcut Shift Alt Up or Down arrow.

After arranging pictures, what next?
In most cases this should be enough. However, here are some more things you can do.
- Some pictures may have unwanted extra space. You can use Crop to remove the unwanted parts.
- As every picture is fitting into the same available area, a picture which is very wide but not very tall will look extremely small. Even in this case, you can use Crop to focus on the important area of the picture.
- You can also apply animation to show pictures one by one or in rows.
- Once you are satisfied with the results, remember to delete all the original hidden pictures. After all, they are still occupying space and will increase the file size.
Convert back to pictures
Remember that the final output is SmartArt. Therefore, it follows some rules and restrictions. For example, if you want to increase the size of one of the pictures, it will resize other pictures as well. Usually this is a good thing.
The macro has already completed its job of arranging all of them instantly. But now you want complete control. How do we get full flexibility?
Well, it is quite simple. Basically, you convert the SmartArt into individual shapes.
- Select the SmartArt
- Open the SmartArt Design tab (menu on top).
- Choose Convert – Convert to Shapes
- Now everything becomes a shape but those shapes are still grouped
- Right click on the group and choose Ungroup
- Now you have full control over each picture.
The only caveat is that the ungrouped items are not original pictures. These are shapes with the picture as a background. Of course you still get all the picture effects. Some features like picture styles will not be available.
In short, if you really want access to the original pictures, copy them and keep them somewhere else – in another presentation – for future use.
There is one more side effect. The SmartArt has a textbox associated with each picture. The reason we could not see it earlier is because the macro makes it invisible. But it is still there.
When you ungroup, there will be lots of textboxes lying around. You will need to select them and delete them. Of course we can write a macro to do this automatically. But we will write the macro only if enough readers request this feature.
How to add the macro to Quick Access Toolbar (QAT)
If you use this macro frequently, it makes sense to add it to the QAT. How do we do that?
Before you begin, keep the macro file open.
Next, right click on the QAT and choose Customize Quick Access Toolbar. Another way is to choose it from File – Options.
Now, open the The next step is to Open the Choose Commands From dropdown of commands and choose Macros.
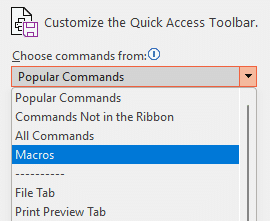
Now choose the Macro – ArrangePics and click the Add button.
As a result, you can click this button to run the macro quickly.
If the macro file is not open, then the macro will not run. You will get an error – “Macro cannot be found…”
Download PowerPoint add-ins collection
You can also download all the PowerPoint macros developed by us as a single add-in.
This add-in will contain all the macros / modules released by us at that point of time. Currently it consists of five features. These are available under the Add-ins tab.

- Animate pictures to create Click-through presentations (this article)
- Arrange pictures instantly – best suited for arranging logos for “Our Customers” type of slides
- Split and animate tables
- Run any slide in a multi-presentation, multi-monitor scenario (adjunct to Presenter View)
- Stop all shows – stops all currently running slide shows.
Useful to close multiple presentations quickly after a session.


