In the earlier article, I covered how to see raw formatting and compare two areas to find out what is different. However, you can greatly minimize formatting issues if you use Styles in Word. Once you start using styles, you will need a new troubleshooting tool – Word Style Inspector.
The Need
Even after two decades, most people do not know about and use styles in Word. Sad but true. Styles are the most important feature of Office you should know about. Read these articles to master Styles.
Even if you start using styles, people around you may not understand these fully. They may still add manual formatting on top of applied styles. In this case, you need to quickly detect the extraneous formatting and get rid of it. This is done using Word Style Inspector.
Remove unwanted formatting instantly using
Word Style Inspector
Reaching the Word Style Inspector is a two step process. First click on the small arrow at the bottom right corner of Styles dropdown in Home tab. That kind of arrow is called a Dialog Launcher. It opens detailed dialog for the current menu group (Styles in this case).


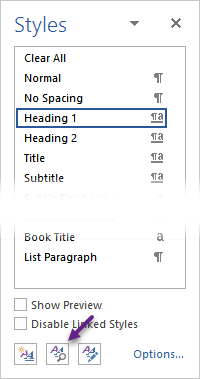
Now a floating pane opens which lists the commonly used Styles. If you want to reduce the number of styles displayed, open the Options dialog. Choose In use from the Select Styles to Show dropdown. But usually this is not required.
This is a very powerful dialog. Take some time to study it. This will help you in many different ways while working with Word.
At the bottom of this pane, there is a button for Style Inspector.
Click to open the Style Inspector and close the Styles pane.
This pane shows the currently used Style and any extraneous (additional) formatting which is manually applied. Notice that there are many eraser buttons in this dialog.
In this case, there is no additional formatting applied. By the way, formatting can be applied to the entire paragraph or to specific text (characters).
Right now, there is neither paragraph, nor text level formatting manually applied.
If you click on individual Eraser button, the related formatting is removed. In this case, if you erase the Heading 1 format, the text will just get the regular Normal style.
Now let us see what happens after additional formatting is applied. Font and Italics are the additional formatting items. Select the entire paragraph and choose the Clear button next to Text Level Formatting. Use eraser to remove the extraneous formatting.

If you want to see all the formatting details, click the lens icon below. That will open the Reveal Formatting dialog which we discussed in the earlier article. If you need Word Style Inspector repeatedly, it is better to add it to Quick Access Toolbar
This is how you use Word Style Inspector. If you have not used Styles, it is better to use the Reveal Formatting dialog (Shift F1).


