Printing from Excel requires careful adjustments in the Print Preview mode. Lot of trial and error is required and enormous amount of time is wasted.
Here is a simple and immediate solution to all printing related issues in Excel.

Contents
The problem
If you never print Excel data you can skip this article.
To be fair, this article solves one specific and very common problem. It does not address ALL possible problems.
Usually we follow these steps:
- Create the Excel file
- Add data, formulas, charts, Pivots, etc.
- Finalize the workbook
- Go to Print Preview
- At this stage there is lot of adjustment required to be done to fit things in a logical and readable way
- This process is time consuming and frustrating
Why don’t we face this problem with Word?
This is because Word shows you how the document will look after printing all the time. When you create a new document is is in Print Layout mode by default.
Therefore, while working with the document, we know how it will look when printed. All adjustments are shown LIVE.
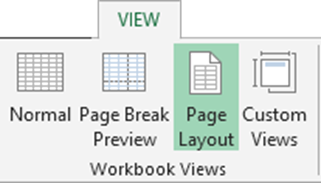
In Excel, the default view is called NORMAL – which only shows the spreadsheet and does not bother about page breaks and header footers.
There is also a page break preview but it does not show header / footers.
The solution: Page Layout view in Excel
Unfortunately this feature was added in 2007. Unfortunate because most people who desperately need this facility have simply not noticed it.
The idea is to use this view as early as possible. Ideally, if you know that you are going to print this Excel file, go to this view as soon as the new file is created. If it is an existing file, go to this view before going to Print menu.
Page layout view
This is a very useful view. It shows the exact way in which pages will be printed – like the Print Preview. But Page Layout view is very powerful because it allows you to use the full features of Excel while in this mode.
Print preview only allows changes to margins which is not very useful and flexible.
It shows the regular row and column headers as well as horizontal and vertical rulers simultaneously. Using these rulers it is possible to perform precise alignment and adjustments.
Click on the header to change it directly in this view. Header Footer Tools tab has all the commonly used options.
To open the full dialog for Page Setup, go to Page Layout Tab and click on this arrow in the corner.
Creating perfectly aligned data for pre-printed stationery
This is an even more tedious process.
Here is how you can simplify it. Scan the existing paper based form into an image of the correct size. Add the image in the header – it gets added and adjusted from top left corner of the page. Adjust the image so that it occupies the page area properly.
Now create the fields, data items and adjust them to align with the stationery. Before printing, remove the image from the header. Now you will get perfect alignment.
In some cases the paper form has limited space but if the data is more, it spills over the available space. You can avoid it by choosing the Format – Cells option – Shrink to Fit
Was this topic useful?
Do post your feedback and queries here. Make sure that you share this article with all your colleagues and friends who face printing issues with Excel.


