Power Query is undergoing rapid enhancements based upon feedback received from users. On 29th May another new update was announced.
If you are using Power Query, please update it to get new features. Download it from here. The version number of this update is 2.12.3660.142

Contents
What is New
Details are available in the Power Query Team Blog article. Here is a summary of the new and enhanced features and how these will be useful to you in day-to-day work context.
Issue to be aware of: Loading a query for the first time fails if any worksheet in the workbook is protected.
If something is not working as expected, first check the release notes.
Recent sources
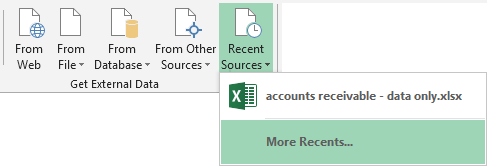
Simple but useful feature. Long awaited. Shows recent sources used by Power Query.
You can pin commonly used sources from the More Recents … option.

Right clicking on a source allows you to connect. Unwanted sources can be manually removed from the list.
Useful option: Copy path to clipboard
This is an interesting and useful option. For example, you have a text file as a data source. Now next month you need to append more data to the same file. Or if it was an Excel source, you want to change some parameters and recalculate the source file.
In either case you will have to go to the source data quickly. Copy path to clipboard option will be very useful in these scenarios.
Of course, it also copies the HTTP path in case of a web query.
Choose Columns
This is a very convenient feature. In many cases we receive lots of columns of data and we have to choose 5 columns which are far away from each other by using ctrl – click carefully – multiple times. This was error prone and frustrating.
Now you can select columns using a simple dialog. Selection dialog does not do any other operation. Once selection is done you choose what transformation you want – for example Remove Columns / Remove Other Columns, etc..
New, Powerful ways of manipulating data
Transpose
Works like Excel Paste Special Transpose. Will be useful to change the row – column headers before UNPIVOT operation – if the original data was in reverse order.
Reverse Rows
Interesting option where the first row becomes the last row and vice versa – the entire data is turned upside down. When is this useful? It is like a global sort across all rows – NOT on a particular column. We used to do this by adding a separate column, putting serial number there and sorting it in descending order.
This is useful in cases where the data is received in the wrong order and you do not want to repair the order on every periodic refresh. Think of it like printing pages of a book and rearranging them in reverse order because originally the reverse order was not chosen.
Reordering Columns
This does not change the data in any way, but allows you to alter the order of columns. You could also do it with drag and drop.
Replace with length of text
Interesting feature which works only on text type of data. If you choose Length from the Transform tab, the data in the column will be replaced by the Length of text in each row.
It is a destructive feature because it overwrites data in that column. So be careful with this one. I would first create another calculated column which contains the original text and then perform the length operation on it. This column can then be used in further formulas to perform differential calculations based upon the length of the text.
Date manipulation
Date, time and duration have some very useful transformations. All these are destructive. So remember to perform them on a copy of the original column or learn the syntax and use it directly in the calculated column.
Insert menu is more sophisticated
Earlier we had to insert a new custom menu and manually tweak the formula using M language. Now, if you need a calculated column based upon some transformation of an existing column, rather than going to the Transformation tab, go to Inert tab and choose the original column and the transformation. It will be added.
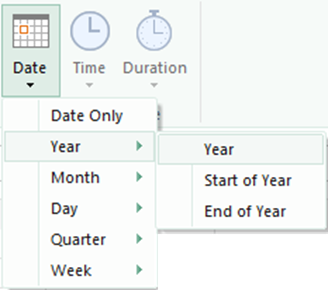
Example. Here we have a data column and we want a column containing year.
Select the column, go to Insert Tab – Date- Year – Year.
A new column is added containing year for each of the rows. The original column is not disturbed. Don’t get confused. The new column is added after all existing columns. Of course you can reorder it if required.
The M formulas for it is as follows. As you work more with Power Query, you should learn this syntax so that you can combine queries more efficiently and reduce processing time as well as complexity of the data clean-up and preparation process.
= Table.AddColumn(TextLength, “Year”, each Date.Year([Due date]), type number)
Insert vs. Transform
Insert always adds a new column, based upon current column. You can choose the operation.
Some Transform operations – those which work on individual columns – change the existing column content destructively using the transformation operation chosen by you.
Use transform if you do not need the original values. Use Insert if the original value is important but you also want to derive more value from it some business reasons or for usage in another formula.
Best practices for demo warriors and trainers
If you conduct lot of sessions and training programs around Power Query and Power BI, here are some things which will help.
- It is a good idea to restart Excel just before the demo.
- Keep a sample file with countries names in one column and amount in another
Just before the demo, create a Power View and choose the Map option to check the Silverlight installation as well as connectivity issues. - If you are using Power Query to conduct a demo or a training session, check the data source connectivity and the practical download speed you are getting
- Keep a pre-downloaded version of the same data ready, in case connectivity fails
- Also keep a backup presentations with important screen shots in case the whole demo fails. This can happen if you want to show the 2 D mapping of PowerView or Power Map based 3D visualization.
- A visual, 3D tour with multiple scenes is a very impressive feature of Power Map. If it does not work, the most impressive demo fails. Be prepared by creating a tour BEFORE the session starts and convert it to a high resolution MP4. Ensure that while creating the video file from Power Map, you have very good bandwidth.
Start rendering the video, let it continue for a while and then abort it. Now start rendering it again. Even with very good bandwidth, I have found the second render to be smoother than the first one. - Always keep a backup connectivity option if you are going to touch any internet based data sources and use Mapping features.
- Power Map add-in needs to be activated manually in some cases. Therefore, before a PowerMap demo, it is a good idea to restart Excel, enable the add-in and continue with the demo. I have come across frequent crashes if I run Power Map demo after a Power View demo.
- At least as far as this update is concerned, make sure that none of the worksheets are protected if you are going to demonstrate Power Query.
Enjoy.


