Presentations containing lot of photos or images tend to be very large in size. It makes them unmanageable and often impossible to send by mail. Yes, you can compress images one by one, but since Powerpoint presentations usually contain lots of images, it would be a tiresome and furstrating job.
But fear not! There is an solution!
Contents
You can compress ALL photos / images in ONE step!
Double click on any photo / image
Choose Compress Pictures from Picture Tools
Unselect the option Apply to this picture only
It means apply the compression to ALL pictures in the presentation.
Choose 96 PPI (Pixels Per Inch)
It is good enough for on-screen presentations in most cases although it mentions 150 ppi as the recommended setting.
Now save the file. That’s it!
This method works with Word and Excel as well.
Warning: Try this on a COPY of the original file.
Compare the results of before and after and then choose if the compressed visuals are acceptable.
Remember, when you save and close the compressed file, you cannot undo the changes.
By default – you will NEVER see real high resolution images in PowerPoint
Oh, this is not a bug.
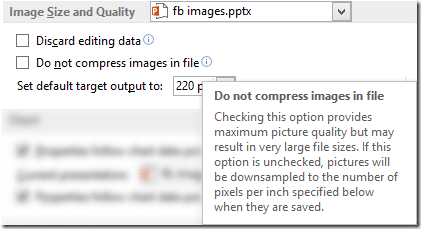
PowerPoint automatically compresses ALL images automatically to 220 ppi.
This happens behind the scenes and you don’t have to change any settings.
So if you really WANT TO SHOW high resolution pictures, then you must choose the setting Do not compress images in file. This is a file level setting. It affect ONLY the currently open file.
The setting is there in File – Options – Advanced.
Best Practice for showing high resolution images using PowerPoint
Create a new file
Immediately go to Tools – Options and enable the setting Do not compress images in file
Add high-res images
Save the file
If you save the file BEFORE changing the setting, all your high-resolution images are already been downgraded to 220 ppi! Changing this setting after saving the file has no meaning.


