Thank you for responding the vote in the previous article on 3 Efficiency Best Practices. In this article, we explore Word Styles in greater detail. Read this even if you are using Word Styles.

Picture created using Fresh Paint on Surface Pro with finger painting.
Problem: We spend too much time on formatting and too little on the core content.
Solution: Use Word Styles
Styles are just ready to use formatting which is created by graphics experts. There are 9 styles – Heading 1 to Heading 9
While creating a document, you know which of the paragraphs are Headings or Topics or Titles. As soon as you type the paragraph, choose the style.

Main topics get H1, sub topics get H2 and so on.
Contents
How to select styles quickly
- Click the style in the Home tab – Styles drop down (it is called a Gallery).
- Or use keyboard shortcuts CTRL ALT 1 for H1 CTRL ALT 2 for H2 and
CTRL ALT 3 for H3 - Or use the shortcut Shift Alt Up arrow to apply Higher styles, Shift Alt Down arrow to apply lower styles
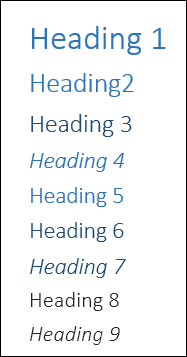
Default styles in Word 2013
This how the default styles look. If you want to change the appearance to match your corporate branding guidelines, Right Click on each style, Choose Modify and change the look and feel.
Customized styles affect only the current document by default. If you want all further documents to have the customized styles, choose the following option in the Modify dialog.

Change the look and feel instantly using Themes
Choose Page Layout tab (2007,2010) or Design tab (2013) and open the Themes dropdown. Just move the mouse cursor over each theme and see how the document reformats instantly with different color and font combinations.
If you find some combination which resembles your brand colors, it is the easiest way of customizing document look and feel for corporate branding. Remember to use the same theme in Excel and PowerPoint as well.
What are the benefits of using Word Styles?
The main benefit is that Word knows what are the main and sub-topics in your document. Word uses this information intelligently to provide you with many useful features.
Navigation Pane
Choose View tab – Navigation Pane. Now a Separate window opens on the left side and shows you the document hierarchy. This never gets printed. This is your on-screen navigator.
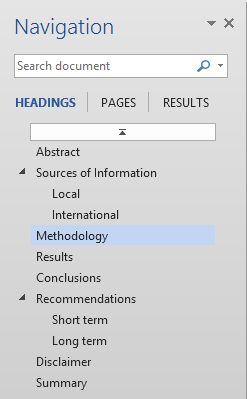
- Just click on the item to navigate to that area. No more scrolling and searching.
- Reorganize the document (and your thoughts) by just using drag-drop.
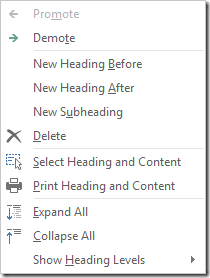
(Amazing! is it not?) - Right click on any heading and you get many useful options. Explore and find out.
The Show Heading levels option is very useful for reading complex documents. Just show level 1 first and then drill down into the desired area quickly.
Sample file for practice
This file contains styles and TOC Download Style Document
Automatic Table of Contents
Now that word knows your topics and it anyway knows the page numbers, it can put these together and create a TOC automatically.
Go to the place in the beginning of the document where you want to create the TOC and Choose References tab and choose Automatic Table of Contents
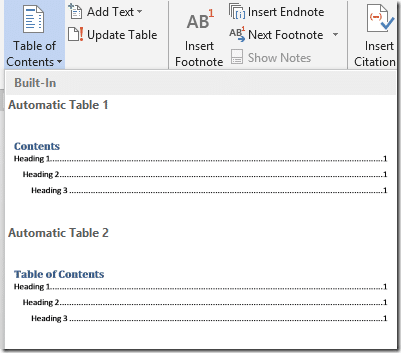
By default three levels of headings are added to the TOC along with page numbers. You can change the settings from the Custom Table of Contents option.
Remember to update the table before printing because the page numbers are not automatically updated when you edit the document. Right click on the TOC and choose Update Field or click inside the TOC and choose Update Table option.
Choose the second option.
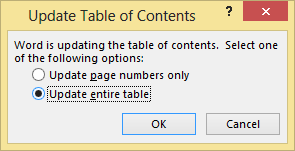
For very large and complex documents you can choose the first option (which is faster) when you are sure that you have not added any new headings. In most cases using the second option is safer.
Retrofitting styles into non-style documents
You will love Styles once you start using them. But then you will feel very sad that your older documents are not getting all these benefits of styles. But don’t lose heart. Microsoft has thought of that as well.
Open a document which is using manual formatting. You need to find all areas where manual formatting indicates various levels of headings and then apply the correct Heading Style. But this is going to be very time consuming if you want to do it one by one. Repetition means inefficiency.
Solution: Select text with similar formatting
- Click in one of the manually formatting heading. Choose Home tab – Select dropdown – Select text with similar formatting
Don’t worry if it shows (No Data). It works anyway.
- Now Word finds and selects similar headings. You just have to apply Heading 1 once
- If you have three levels of headings, you will have to do this thrice. Absolutely worth it because now you get all the benefits of Styles
Next article
Styles have many more benefits. One very useful feature is the ability to convert a Word document to a presentation. I will cover that in the next article.


2 Responses
I am noticing that I am already using many of these features – thanks to your coaching 🙂
Hi, am loving your site and the presentation you gave us today (23.02.16) I do have a question about word.
Is there a way to use the stylised headers and navigation pane in word tables. When I have tried to use headers inside tables, they do not appear in the navigation pane.
As I am currently creating some large tables, would love it if there was a way to put headers in so I could navigate to the correct location in the table without needing to use the find function or scrolling to the right location.
Your assistance would be appreciated