There are many ways to capture screenshots. Some simple, some sophisticated. The most comprehensive one is SnagIt. In this article we will see various methods available along with SnagIt.

Contents
The need
Screen capture is a common need. We use it to for creating training content, presentations, write articles, create videos, write user manuals for software applications and so on. Of course there are many screen capture applications out there. But the undisputed leader in this segment has been SnagIt – for many years!
Here are some options available to you.
Available options
Print Screen
This is the most commonly used option. It captures the whole screen and puts the screen contents into clipboard. That’s it. ALT Print Screen captures the current window. Beyond that there is no flexibility available.
Windows Snipping tool
This is available since Windows 7. It provides more functionality like choosing the capture area

Once captured, some editing is possible. The output can be saved, mailed or put on clipboard. Simple annotation is also possible.
Office Insert Screenshot button
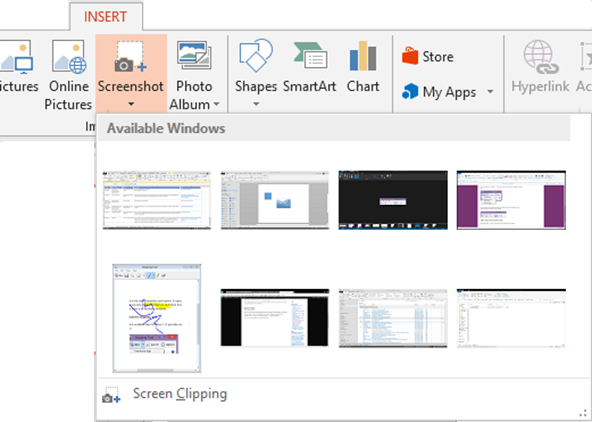
Since Office 2010, you have a convenient option called Insert Screenshot
It shows all currently open windows – so if you want one of these, you can select it directly. After inserting the screenshot you can crop it if required. Another option is called Screen Clipping. Selecting this option hides the current window so that the window behind the application is shown. The screen becomes milky white and semitransparent. You can choose the rectangular area you want. The captured item is inserted into the document.
Once you go into Screen Clipping mode, it does not allow you to change which application is visible. Therefore, you must carefully arrange the window order before getting the correct screen capture.
OneNote Screen Capture
If you have OneNote installed and running, pressing Windows Key and S together also gives you a screen clipping facility. This is more convenient because you can first open the desired application and then use the shortcut key.
The captured image can be inserted into a OneNote notebook or clipboard.
Other tools
There are lots of third-party tools which allow you different levels of sophistication while capturing screenshots. This article is not a review of all methods. However, you should perform your own review if you want to finalize on a long term choice.
SnagIt the undisputed leader
TechSmith has been creating and nurturing this product for over 24 years – the first version appeared in 1990. This coincides (approximately) with the timeline of many Microsoft Office tools as well.
I have been using it since 1995 and continue to use it till date (Version 12.0). All images in this article are captured using SnagIt (except those which show SnagIt functionality!). I cannot describe everything that SnagIt is capable of in one article! However I will highlight some new and some established work scenarios which you will find relevant and useful.
The concept is simple. You capture full or part of the screen, process or edit in different ways and then output it in various ways. Sounds really simple. But you need to see the product to believe the level of thinking and innovation they have done around this simple concept. If you need screen capture regularly, please try SnagIt from here.
Various settings of input, processing and output can be saved as reusable profiles. Each profile can have a shortcut key for easy invocation.
This is the new Capture Window as shown in V12. Earlier it was called One Click capture. It sticks to the top middle edge of the screen and opens up when mouse cursor is taken to that area.
Clicking on Manage Profiles opens the detailed window. This has also undergone significant redesign in version 12. Here you can create new profiles and edit existing ones.
Video Capture
Although it is clearly shown in the UI, many people do not know / use the video capture option. It is not as sophisticated as Camtasia. But it is a single pass option – the video is ready as soon as it is recorded. Video is in MP4 format.
Inputs
A wide variety of inputs are available. Nowadays, I use the All in One – which is versatile enough to take care of most common requirements.
As you know, I create an image for each article – sort of an advertisement. These images need to be of a particular size to maximize compatibility across social media platforms. This is a fixed size input profile with 505×504 pixel size.
There are many inputs possible including full screen, window, menu, fixed region and so on. Notice that contents of clipboard can also be an input source. Scrolling windows and extended windows can also be captured – something very difficult to do otherwise.
The mouse cursor and date time stamp can be captured if required.
Editing
SnagIt editor opens to allow editing before finalizing the capture. In Version 12 the capture itself can be finalized for easy tweaking as soon as you finish the capture. This is a very useful feature to correct issues like precise sizing, removing pixels outside bounding boxes of dialogs and so on.
The SnagIt editor is very sophisticated for what it is designed – working with screenshots. Therefore, it has many options which are highly convenient and specialized. For example, the captured image is always in CROP mode. No special crop mode is necessary- just tweak the dimensions of the image as needed.
It also has a trim mode which removes blank areas around the image to focus on a bounded area.
Edge effects are also very useful for showing parts of the screen. For example here is the same menu shown using two different edge effects – fade and torn edge

One of the most sensible features is that it keeps all the captured images in the library without worrying about you saving them and specifying filenames. This is extremely convenient because while you are working you want to finish the captures – insert them into your content and move on. You don’t wan to be distracted by paths and file names.
Many stamps are available for enhancing the base images. There is a large collection available for free download and there are third party collections also available. These stamps allow the same image to convey meaning in a more impactful way with minimal clutter.
Output
There are multitudes of output formats including all Office tools, Social Media tools, WordPress, Email, cloud storage, and its own Screencast.com.
More outputs can be downloaded from the web site.
Automated file naming
Suppose you want to create a user manual for some application. You will need multiple screenshots and you will want them named in serial order. No problem. SnagIt has a very sophisticated file naming tool.
What if you want some things like borders, color correction, watermark, etc. to be automatically added to the screenshots as they are being captured? No problem – SnagIt will do that as well for you.
DirectX capture / Multiple Monitor capture – you don’t have to worry. Every conceivable kind of capture is possible.
Batch Processing
This is another extremely powerful feature – which I feel is relatively unknown and therefore underutilized. This allows you to perform very fast processing of large number of files without any manual work. Just define one or more operations on the input images and it will generate the output in the desired format, file naming and folder structure of your choice. Amazing stuff.
Mobile connectivity
If you have captured some images on your mobile phone and you want to upload them to SnagIt for further editing, it used to be a cumbersome process.
Now if the mobile phone and the PC is on the same Wi-Fi network, you can easily upload mobile based images to SnagIt on PC using a great new feature called – TechSmith Fuse. This can be downloaded for Android, iPhone as well as Windows phones.
Just select the image from the phone and point to the QR code on the screen. The image will be transferred to the PC without any cables, searching in folders or any other manual effort. It just works!
Best Practices
Here are some best practices I have found to be very useful for my own work. I hope you will also find them relevant.
- Start noticing repetitive actions performed across multiple captures – and create a profile if required
- Decide whether you need the mouse cursor captured or not
- Use appropriate shortcuts for custom profiles to save time
- Change the option – File – Options – Advanced – change the library clear setting to less frequent.
- Make sure you realize that there could be multiple outputs. Therefore one output should always be clipboard. This way, if you make an editing mistake, a safe copy of the image is anyway stored in the clipboard.
- Backup the library often
- Use tags while creating the captures. However, also notice that even without manual tagging, the library intelligently does apply tags which are extremely handy in searching for items after few months.
- Understand when to use Flatten option and when not to. I have not set it to flatten by default. I do it on demand.
- Use callouts and stamps only when required. Do not clutter the images.
- While capturing long video clips, ensure that there is a good processor and lots of RAM available. Long recordings can significantly slow down your foreground work.
- Remember that multiple outputs are possible – for example put the captured image in clipboard, save it as an auto-named file and then also open it in SnagIt editor for further refinement.
- Use the quick access toolbar. Add buttons which you need to use often to QAT by right clicking on the button and choosing Add to Quick Access Toolbar. DO NOT add buttons which already have keyboard shortcuts.
Rearrange the buttons (File – Options – Customize) so that the first 9 buttons are most commonly used items. This gives you 9 extra shortcuts if you press and release the ALT key…Why does it start with 09 after single digits are exhausted? Illogical? Not at all – it is ergonomics. Look at the keyboard and you will know why!
In short, SnagIt is a paradise for those of us who need sophistication and speed of working with images. Try it and let me know your comments.
***


