WhatsApp Chat Analysis.
After writing the pervious article about WhatsApp Analysis using Power Query, I did some further research. I realized that simple string search, the way it is shown in earlier article may not be sufficient. We need more sophisticated search.
While there are many powerful search tools available, there is one tool which everyone has but they do not know its power. That is called Microsoft Word.
This article explains how we can do WhatsApp Chat Analysis extremely sophisticated – with little amount of effort put into learning it.
Contents
Usage Scenarios
Remember that Word is very good at text handling. It is not a substitute to what we did in Excel. But rather it is an adjunct.
Word is best used for searching across the whole transcript – sort of global search. Unlike Excel, Word cannot filter on specific date or month or person. But it can show all instances of a search word across the board.
So we cannot ask Word to tell us how often did the phrase “complaint” appear in the month of May. But we can see how often it occurred and which were the sentences in which it appeared. Search is very fast and very flexible.
- Find out how many times a particular word appeared across the conversation
- Find out the context – the paragraph where it was mentioned
- Find out various forms of the word – run, ran, running
- Find out all product serial numbers – any number which is 8 digit and starts with 239
- Search for “Welcome” followed by name of customer – in case of a helpdesk chat
- Slang and poor punctuation is used while chatting. So if you search for “don’t” in Excel, it will not search for “dont” Word can.
In short, Word is good with words, Excel is good with Data.
And in case of social analytics, we need their combined strength.
Why not use specialized tools?
I have not done a detailed search on such tools. But yes there will be tools and more tools. What I am showing is a simple approach which works with something you already have. Besides, this will also help you use Word better while reading other documents. Search is a generically beneficial skill to have.
The approach. Learn every feature. The application will then be obvious.
In some cases, it is easier to go from problem to solution. In this case, however, it is better to just learn every feature available and then our brain is smart enough to figure out when to use it.
So we are going to focus on the Find Dialog. If you are using Word 2007 or earlier, press CTRL F.
Word 2010 onwards, the CTRL F shortcut does NOT open the dialog. It opens a separate window (a pane) on the left side. We want full dialog of Find. Here are different ways of opening the Find dialog in the newer versions:
- Press Ctrl F, let the left side pane open. Open the dropdown and choose Advanced Find
- Press Ctrl H – which opens the Find and Replace Dialog and then press Alt D to open the Find tab.
- Right click on the Ribbon, Choose Customize Quick…, Choose All commands from the Popular Commands Dropdown and add the item Advanced Find to QAT. Move this to a position 1 to 9 on QAT. (assume position 4). Then the shortcut is Alt 4
If you use the full version of Find dialog often, the third option is better. Otherwise use 1 or 2.
How does Find work
You have to specify find WHAT and find WHERE. Let us focus on the WHERE part first.
There are four places it can look for within a document. By default it will look for it in the entire document. But if you want to restrict the search, you can select a specific area. Alternatively, you can also search only within comments or headers / footers.
Where is the Find All button gone?
Where to search is controlled from Find In Dropdown. If there is nothing selected, and you don’t have headers/footers or comments, opening this dropdown shows only ONE option – Main Document. That is equivalent to Find All.
The practical problems associated with Find
If you choose Find Next, it finds the first instance of the word and waits. At this stage you have two problems.
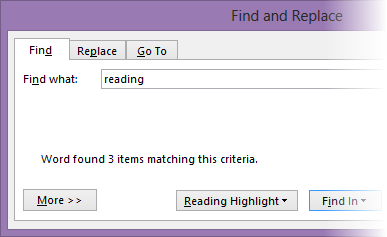
Firstly, you don’t know how many times this word is found. So you have to waste time clicking Find Next, Find Next repeatedly. This can be solved easily by clicking on Find In Main Selection – which selects all instances – and also specifies the total number of instances found in the dialog itself.
Secondly, the find dialog comes in the way and you cannot read the whole sentence. That is why you need to press Escape and get rid of the dialog. Now you can read but you cannot go to the next instance – because the Find Next button is no longer available. It was closed with the Find Dialog. The solution is simple. Remember a very important keyboard shortcut – Ctrl PgDn or PgUp. Using this you can move to the next or previous instance of search phrase with ease.
Choosing Find in – Main Document selects all instances so that we can view them all by scrolling. But selection is a temporary thing. If you click somewhere outside the selection by mistake, all the selection goes away and you have to repeat the process – and also lose the current place where you were. To avoid that, there is another option to Highlight all the found words – using the current highlighter color – which by default is yellow.
Now the selection is shown in highlight color and it does not go away till you choose Clear Highlight.
The Find Pane
Pressing Ctrl F gives you the new Find Pane on the left side since Office 2010. This has its own advantages. When you type a word there, it automatically does a Find All and shows you the total count immediately. It also shows the sentences where the search phrase occurs – which helps you quickly identify the desired place without repetitive Find Next.
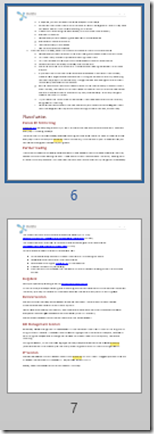
But that is not all. If you choose Pages , it shows thumbnails of only those pages where the search word appears. You cannot read anything in this view. But you can see the overall number of yellow highlights on the miniature page and then assess the density of the search phrase. If you are looking for the page where this word is discussed in detail, you just have to scroll in this view till come across lots of yellow highlights.
Heading Styles Search
This is not relevant while looking at chat transcripts. But very much useful while searching formal documents. If you have used Styles, then it shows the search word context by the heading or sub heading.
This is a quick way to quickly assess the coverage of a concept or idea across the document.
Finding the right place
Now that you know all the mechanics of Finding something… now let us put all that together practically.
If you want to find something, first think – is it a specific instance I want to search or I want to know the overall number and distribution of the search phrase. So question one is specific or global.
Specific instances
If specific, then think if you already know approximately where it will be? If yes, navigate to that area (using navigation pane, if you are using styles) and select the suspect text. Search within it. This simplifies the process and you find what you want faster.
Initially, it is easier to do the simpler text search using the new Find Pane. Just type Ctrl F, type the search text and see the overall results number.
If the number is too large, then you need to do something to focus the search further. If the number is small then use the search results sentences or page thumbnails or navigation pane to identify the instance.
Remembering the location after finding it
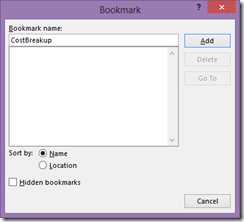
Once you find it, think – will I ever need to come back here in future? If yes, add a Bookmark. This step is often missed. Due to this, you have to keep spending extra time for searching the same place again and again. What a waste!
Choose Insert tab – Bookmark, type a name and Add it.
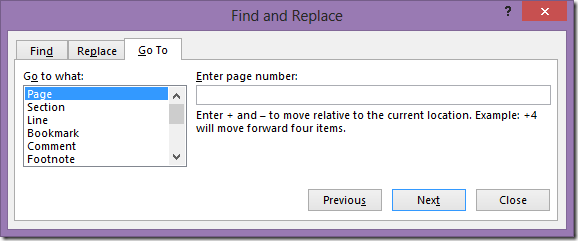
Next time you want to go there press F5 (GoTo)
Now you can go to the bookmarked locations quickly.
Notice this Go To dialog – it is very powerful. Try it out with a big, long document. Actually is it a part of the Find and Replace dialog but hardly anyone notices its power and usefulness.
Global search
Start with the search pane. Add the search condition. Look at the overall count. Thumbnail or Heading based distribution and then interpret the data.
You can always drill down using any of the views.
What next
Now that we have understood where to search, I will cover WHAT to look for in the next article.
— —


