Mouse buttons
Every Windows mouse has at least two buttons. Usually there is a mouse wheel as well – for scrolling. But nowadays there can be many more buttons available.
I use this mouse
This is the one I use. Microsoft Notebook Presenter Mouse 8000. In my opinion, the best mouse ever created (across vendors, not just Microsoft). This one is Bluetooth, has a tilt wheel (for horizontal scrolling, very good for Excel), Zoom button, PowerPoint draw button.
But that is just the beginning… When you turn it around, it becomes a presenter…
with next / previous slide, Volume up down, Play pause (for media center or WM player) and finally has a built-in laser pointer.
Unfortunately, this model is discontinued long back, but I have my own stock ![]()
Left click is obvious… or is it?
Left button (for a right handed person) is the default button. A left handed person can configure Right button as the default.
The question is – what is more efficient? Using mouse or using keyboard?
The answer: use both … depending upon what is more convenient at that point of time.
If you are typing text and then you want to highlight it, keyboard shortcuts are preferred.
If you were scrolling and reading a document using mouse wheel and now you want to highlight some part of it, then use mouse because your hand was already holding the mouse.
The key thing is to maintain your flow. If you are busy typing something and then just to click on the OK button you move your hand all the way from keyboard to mouse … it disturbs your concentration and thought process.
Customizing mouse button actions
If you have additional buttons (for example, mouse wheel is also a clickable button), then you can customize the action. Go to Control Panel – Mouse – Customize and you will be surprised to see so many options…
Here is what can be done using a button click : Back, Forward, Next window / Previous Window, Autoscroll, Cut, copy or paste, Undo / Redo, Digital Ink On/Off, Instant viewer, Alt, Shift or Ctrl keys, New, Open, Close documents, Double click, Exit program, Gaming toggle, Magnifier, Show / Hide Desktop, Zoom in / out, Precision booster, Start … a program, Keystroke…
Instant Viewer
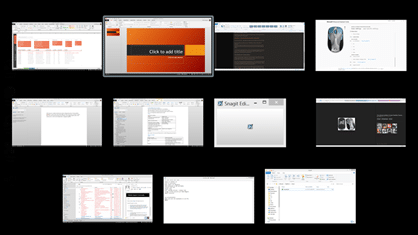
I find the Instant Viewer to be very good. This shows you all open applications on the desktop – allowing you to choose the desired one quickly. This is faster than Alt – Tab or Taskbar.
Magnifier
For technical presentations, you need to explain the UI, Code, Dialogs, configuration options and so on. Regular PPTs have large font. But these elements are never seen properly by the audience. Therefore the full screen Magnifier (included since Vista) is a very good tool to map to an extra mouse button.
Using Magnifier correctly: When you invoke it, the Magnifier window appears on screen. If you try to get rid of it, the window converts into a lens and that lens remains on the screen. This disturbs your presentation.
Solution: Click on the lens to show the magnifier window again and click Minimize button on the window.
Gaming
Precision booster, key combinations and Macros can be very useful for gamers. Special gaming mice offer even more sophistication.
Program specific button customization
Yes there is more!
For example, in case of Excel you may want wheel button to scroll but in PowerPoint you want that same button to be a Zoom In / Out button. This type of customization is called Application Specific Settings. Explore this for applications you use commonly.
Imagine how much thought has gone into a simple, taken for granted thingy called mouse! Just to make our lives easier.
How many times can you click?
We know single click and double click. But there is more.
Double Click: Special cases 
| Application | Effect of double click |
| Word | Double click selects the word at cursor. Triple click selects the entire paragraph. |
| Office | Format Painter double click allows you to pick formatting once and then apply it to many different areas / objects |
| Office | Double clicking on some specific buttons allows you to do repetitive actions. This is called Locking the mode.
· Till version 2003, in PowerPoint, double clicking on any drawing shape button allows you to draw the shape repeatedly · 2007 onwards, you right click on the shape and choose Lock Drawing Mode |
| Excel | Double clicking in a cell allows you to view and edit the formula (if present) |
| PowerPoint | Double clicking a shape or picture or vide brings up the relevant Ribbon tab. |
| Chart elements | Since Office 2010, if you double click on any chart element, its customization dialog appears. |
| Any file based object | Double clicking executes the default action.
For Word and Excel objects default action is Open. For a movie / sound object the default action is Play. |
| Pivot Table | Double clicking in row or column area brings up the drill down dialog. Double clicking in data area creates a new sheet and shows you all the rows from raw data which contributed to that value. Very useful to find out lineage (underlying raw data) behind summarized reports. Do NOT double click on the Grand Total, it will create a new sheet with all the raw data copied! (This is actually very useful in a specific situation, but we will cover that some other time) |
Slow Double Click! 
Sounds funny? But it is true and it is very useful in day-to-day work.
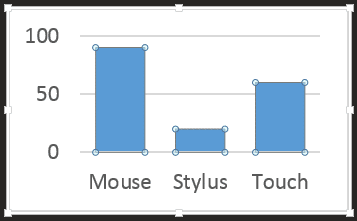
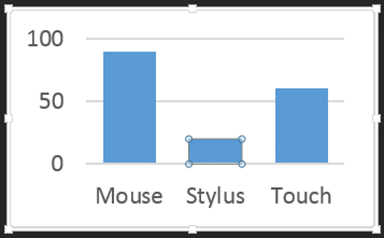
While customizing charts, we need to format a particular series or marker or data label. We want it to stand out from the rest. How do we do it?
Depending upon which version of Office you are using, Double Clicking the item of interest will have different results.
Before Office 2010, double click had no impact. Single click on any element selects the entire series. From 2010 onwards, double click will open the format dialog / task pane for that element.
What we want is to select a single item – not the series. That is where SLOW double click comes into picture. This works in ALL VERSIONS of Office.
Click on the element – let it select the whole series. Wait for 2 seconds. Now click on the element you want to want to customize. Now the single element is selected.
Try it immediately …
Triple Click 
Yes this is possible ![]() in Word. (I don’t know of any other examples of Triple Click for Office. If you know any, I would love to hear from you)
in Word. (I don’t know of any other examples of Triple Click for Office. If you know any, I would love to hear from you)
- If you double click in a paragraph, it will select a word. But if you TRIPLE CLICK, it will select the entire paragraph. This is very useful to select long paragraphs, without having to struggle with cumbersome drag based selection.
- If you double click on the left side of a paragraph, it will select the entire paragraph. If you triple click there, it will select the entire document. Of course there is a much simpler keyboard shortcut – Ctrl – A to do that. But still triple click may be more convenient in some situations.
- Triple Click in a table cell, it selects the entire contents of that cell.
Press Ctrl key and click anywhere in the paragraph to select the SENTENCE – a very smart and useful feature in Word.
Selecting things using Mouse
Many useful variations you must know…
Before you proceed, just remember that pressing helps in working with many items at once whereas
helps us work with one item at a time.
Selecting large amounts of text
Usually we drag the mouse to select text. However, if the text is very lengthy, there is another method available. 3 steps…
- Click where you want to begin. This will position the text cursor at the beginning.
- Now DO NOT DRAG and select the text. Simply scroll till you can see the end point of selection.
- Now press SHIFT key and then CLICK at the end point. Now all the text from begin to end point will be selected.
Very useful while selecting large chapters in Word or Selecting long tables in Browser. Of course, if you use Styles, you DON’T need to select large blocks of data EVER AGAIN in Word (will explain some other time).
Selecting large blocks of data in Excel
The same concept applies to Excel as well. If you have a large block of data, click in the first cell, scroll to the last row and column and then SHIFT-CLICk.
However, in Excel finding the last row itself may require lot of manual scrolling. There is one useful shortcut which can help you. Press
keyboard shortcut.
This takes you to the LAST CELL in Excel. This is the cross section of the last row and last column used in that sheet. If your worksheet contains just one large block of data, you can know the last row by pressing CTRL-END quickly.
However, CTRL A is a faster way of selecting large amount of data in Excel. Click anywhere inside the data block and type CTRL A.
Selecting multiple items in a list
This is also done in a similar way. Click in the beginning, move to end and SHIFT-CLICK.
If you want to remove some selected items, use CTRL-CLICK.
Selecting objects
You need a different approach to select multiple drawing objects, shapes, images etc in PowerPoint (and other programs).
- To select a single object, just click on it
- To choose and select multiple objects one by one, use CTRL-CLICK. You can also use CTRL-CLICK to UNSELECT an object which is already selected.
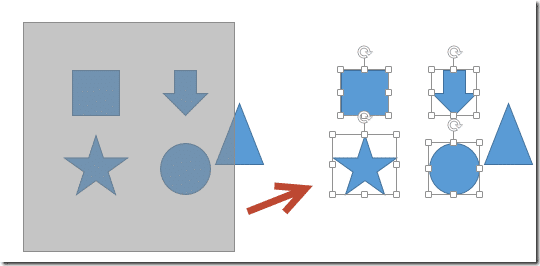
- To select multiple objects in one action, draw a large rectangle AROUND the objects. Any objects which are fully within the rectangle will be selected.
Part 3 needed…
There is much more to write about : Drag Drop, Keyboard along with Mouse, Right Click…
I know it is becoming a very long topic. However, the feedback has been very encouraging and it is useful on daily basis. So I will do justice to this important, yet ignored topic by covering it in detail.
Do post your comments…


