Contents
Problem
One of the participants (Mr. Amjad) in a seminar I conducted asked me this question. The scenario is common enough. But the solution is not even noticed – it is called Flash Fill. Instead, we struggle to solve it manually (and inefficiently).
There is data in one column which contains name followed by amount. We want to split the amount.
Doing it using a formula is tricky. Because in some cases there are two spaces, in some cases there is only one space. And may be if the data is large, there could be three spaces as well.
Easy solution: Excel 2013 – Flash Fill
This is an amazing new feature. I will cover it in detail in a separate article. However, here is the way it works.
In column E, specify what you want. Just type the value. NO formula.
Then choose Data tab – Flash Fill
Do the same thing for the name in column F. That’s it. Excel has an amazing pattern matching engine which does the job for you.
What if you don’t have Excel 2013? Use Word!
Then you will have to resort to complex formulas or VBA. But not really. We often get too focused on the product and forget that Office has other tools as well.
Remember. Excel is great with Numbers and Dates. But not text.
In fact what Excel 2013 Flash Fill does is technically called pattern matching (Regular Experssions). But Word had this feature since many years.
Let us see how to solve complex Excel data handling problems in Word.
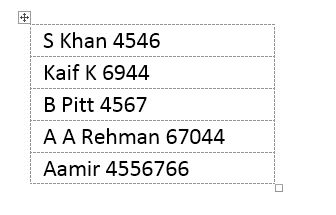
- Copy the column data and paste it in Word
- It will be pasted as a table. But the table borders will not be visible.
- Click inside the pasted data, you will see the Table Tools tab
- Click the Layout tab and choose View Gridlines
Now you can clearly see the table - We want to select only the numbers
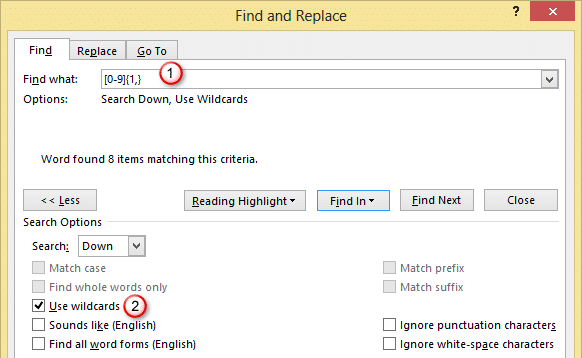
- Press Ctrl H to open the Find – Replace Dialog
- We don’t want to replace anything so click the Find tab
- In the Find textbox, type this exactly as shown here [0-9]{1,}
- Click the More>> button and choose Use Wildcards option
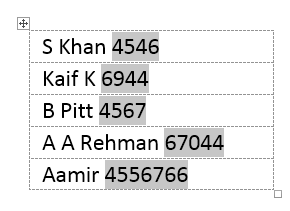
- Now try Find Next multiple times. Notice that it is selecting all the numbers one by one
- But we want to select all numbers. So open the Find In dropdown and choose Main Document
- Now all the numbers will be selected. Close the Find dialog.
- Press CTRL X to cut the numbers and put them in clipboard
- Only the names are left in the first column.
- Now add a new column.
- Select the second column
- Press CTRL V to paste the numbers
- Now select the whole table and paste it into Excel
- Job done!
For the sake of completeness, the names column will have an extra space at the end. Add a new column and use the TRIM function to remove the trailing spaces if required.
Sample Word file for practice Download
How did this work?
The magic happened in that complex looking search criteria
[0-9]{1,}
Wildcard option means do not search what is typed literally. Try to interpret it.
[0-9] Means search for any number between the given range. But that would select only one digit.
{1,} Means that Word should search for one or more instances of number. That is how it selects the entire number
Want to know more?
Click in the Find textbox in Word, enable Wildcards and click the Special button.
You will see the entire syntax of what is possible. This is infinitely powerful and easy to use once you understand the concept. Try it out.


10 Responses
Hi Sir, very useful, Regarding the QUIZ – In MS Word, File>Options> Proofing, Last Option – Hide Spelling Errors and Grammar Errors. (I used it some times) ; Thank you, Regards, Abhishek Chaudhary. abhishek.c@tatamotors.com
Wow… we already have a winner in less than 30 minutes. You are really efficient Abhishek! You will receive a mail with the voucher details soon. Thanks for responding.
The name consist of a single letter and a word.So for single letter there will be no error. If you have already added the words into your local dictionary then also no error. (this will not hold good for me 🙂 )
OR
You might have activated this two Hide spelling errors in this document only
and/or Hide grammar errors in this document only (this will not affect othe documents)
Simplymanas@gmail.com
Hi Manas.
Thanks for replying. The setting is – File – Options – Proofing – Hide spelling errors (and Hide Grammar errors). This setting is per document and more importantly, it travels with the document.
Yes nice thank you. I love to explore this. And i must say your tips and tricks are really efficient.
Thanks Manas. These are NOT “Tips and Tricks”. Why not?
Usually Tips and Tricks are of the type – this problem – this solution. That’s it. The concept is not explained. How it happened is never explained – why? Because, apparently, nobody is interested. Everyone wants quick and dirty solutions. Unfortunately, that is not called LEARNING. That is SPOON FEEDING.
Specific problem may be solved. But with little extra knowledge, the benefit can be amplified. That is what I am trying to do.
Problem – Solution – Concept – Further stimulus = Wholesome Learning 🙂
Absolutely right. I just used that jargon as that is being frequently used. Even I am 100% agree to your “Wholesome Learning”. I love writing as well and I am trying my best to explain couple of concepts from MS-Office. Thank you so much you liked my blog. Please keep guiding me to write more such and if possible some feedback I can work on. http://manasdash.wordpress.com/2013/11/05/2-ms-office-gyan-for-the-day-powerpoint-2013/
Answer to quiz:
go to> “Word Options” from top left Office Button
>Select “Proofing” from the side menu
> on right frame under “Exception for” you will find the current document’s name which is open
> Select the check box “Hide spelling errors in this document only”
Done
Document will not show spelling errors with red wavy line below it.
Hi Atul
Thanks for replying. But the prize is already taken. I got the reply within 20 minutes of posting. See the comments section for details.
Enjoy
Dr. Nitin
Reblogged this on Sutoprise Avenue, A SutoCom Source.