PowerPoint is usually used for delivering live presentations. The presenter shows slides and speaks or explains things during the presentation.
This article shows how to create reusable, narrated training material – right within PowerPoint. No need to use third party add-ins or applications like Flash, Captivate, Camtasia, etc..
Contents
The need
We often have few experts in the organization. They may need to create training content for all staff members. You may even hire some external experts to conduct internal training. If you have very few attendees, there is no problem.
However, if you have many people who need to get trained, scattered across locations, you will face various problems:
- Conducting repeated training batches adds to the operational cost
- External consultants / trainers have to be paid for each batch
- Internal experts may not have the time to teach everyone
The obvious solution is to conduct ONE live session and then create reusable training content.
Traditional method of training content creation
The simplest one is to capture notes while the live presentation is going on. Add these notes to each slide and then post the slide in your learning portal. Later on, anyone can view the presentation and the slides and learn on-demand.
The disadvantages?
- Reading notes while viewing a presentation is cumbersome. You need to see a slide, stop the presentation, read notes again and so on.
- Alternatively you could use the presenter view, but it reduces the screen size of the active slide.
- Reading notes does not generate the same level of impact as attending the live session and listening to the expert.
The solution
The solution existed for many years – as usual unnoticed by the world. Here we have a small, four slide presentation.
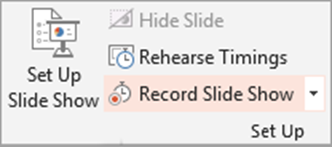
It is very simple. Ask the presenter to choose Slide Show – Record Slide Show option. In older versions of PowerPoint, this option was called Record Narration.
Now a dialog appears – choose Start Recording
Deliver the presentation as usual. You will see a small timer on top. Ignore that for now. Jut speak few sentences for each slide and move on to the next slide.
Finish the presentation as usual. Then run it and see what happens…
Miraculously, the presentation has now become self-running. It shows the slides, your voice is played back and the slides automatically advance further.
We just created reusable learning content!
Now go back to the slide sorter view and see what happened.
Notice that PowerPoint was counting the time for which you spoke on each slide. It has automatically set the timing for each slide.
In addition, PowerPoint automatically recorded your voice, including any interaction with the audience (whatever the default microphone can pick up). It saved the file and embedded it in each slide. Appropriate animation is added to the embedded audio object so that it plays automatically when the slide is shown.
Run it on Browser
If you store the presentation on OneDrive or SharePoint (2013) team site, it can run on a browser page – no need to have PowerPoint to view the presentation. It will run automatically and play the narration as well.
The benefit? Presentation delivery is exactly as you want. But you can protect your presentation from being copied and reused in an unauthorized manner.
If you want to protect your Intellectual Property further, you could use IRM – Rights Management to protect the file. Read this article for details: Protect Leakage of Confidential Data and Files: For free
Convert to video
If you want to distribute the content freely, you have a problem – because to run the file you need PowerPoint. If you cannot guarantee that the target audience will have PowerPoint installed, you have another choice – convert it to a video.
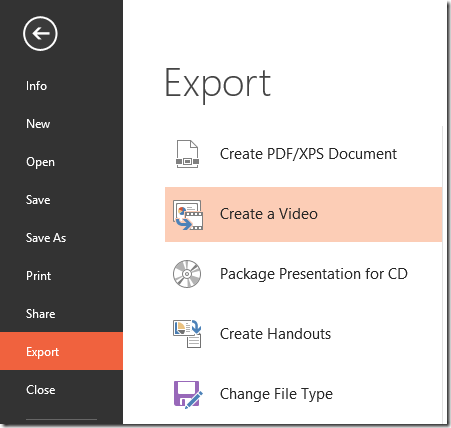
This is available in version 2010 and above. File – Save and Send (or Export) – Create a video option.
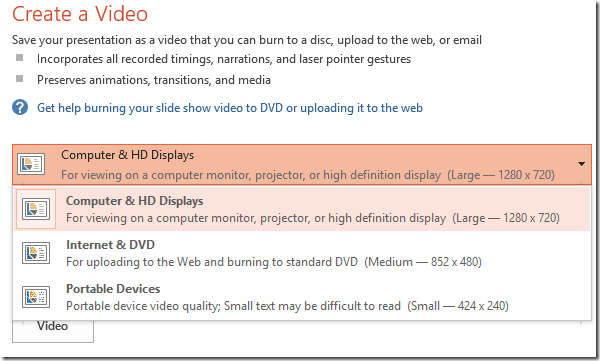
Choose the resolution of the video. Notice that you just have to choose one of the three options. You do NOT need to know about the complexities of various rendering methods, streaming formats, codecs and other technical details.
Higher resolution will lead to larger file size. I suggest you try the medium resolution first and if it is unacceptable, move to the Computer & HD resolution.
For mobile phone playback the last option produces the smallest video file size.
With PowerPoint 2010, only WMV format is available. This is a bit restrictive because WMV files cannot run on all kinds of devices. You may have to use some third party application to convert WMV to MP4 (or some other suitable format).
With PowerPoint 2013 you get a choice of WMV or MP4 output format. Obviously, MP4 is the preferred format.
Remember to test the video on various devices before you distribute it on a large scale.
Best Practices
- This presentation is going to be viewed and heard by many people in the future. Therefore, it is a good idea to take some time to prepare the exact narration and do a rehearsal.
- In case you speak something wrong, you can repeat the slide narration using the small toolbar available during the presentation recording.
- If you are interrupted for some reason, you can also pause the recording using the same toolbar.
- Remember that when you change the slide, PowerPoint has to save the last slide’s audio file and embed it. This takes a few seconds (or longer). If you continue speaking while you change slides, some part of the narration will be cut off abruptly.
To prevent this problem, pause for a few seconds before and after changing slides. - Work on a copy of the original presentation – because you may want to deliver it live – without the narration.
- Check the microphone and recording quality. If the laptop microphone is not sensitive, use a table-top model. If you want the discussion to be recorded, test the positioning of the microphone to ensure that it can pick up sounds from all participants
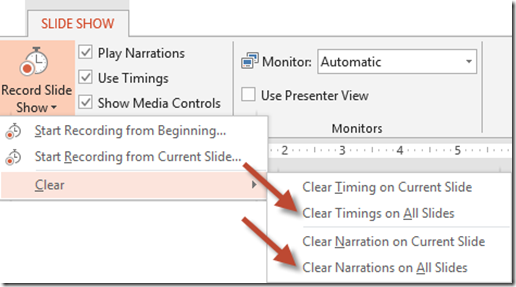
- If you have added narration and timings to the original presentation, you will get confused next time you present it – because the presentation will start automatically and advance slides automatically. In this case, you should save a copy and then REMOVE the timing and narration from the presentation. How to do this? Just open the dropdown of Record slide show option and choose these options.
- If you add some background music later, you will need to modify the animation so that the music runs across the slides.
In the next article, we will cover how to use background music throughout a self-running presentation.


